User guide AlarmTILT® V5

User guide AlarmTILT® V5
Face any situation, Preserve your business, Collaborate in any situation.
Contents
Getting started with AlarmTILT®.
Connect to AlarmTILT®
The AlarmTILT® interface
Against a forgotten password
Change the language of the AlarmTILT® interface
Contact AlarmTILT® Support
Administration.
Add a contact
Create an authentication profile
Import/Export of contacts
Create and manage a contact group
Create and manage a dynamic selection
Maintain the data of your contacts up to date
Create a contact attribute
What is a global alert scheme?
What is a personal alert scheme?
Create a calendar
Add an event
The AlarmTILT® alert thread
Create a report
The different reports
Create an administrative unit
Share the directory between administrative units
Creating and accessing a cross-service link
Print an overview of contacts by administrative unit
Management of Procedures & Alerts.
Create a procedure
Configure/create a launching form
Set up a field in the launching form
Define conditions in your procedures
Set conditions for recipients
Create/configure a step
Copy the contents of a step
Create an alert message
Copy the contents of an alert message
Manage documents/images of procedures
Use system variables
Objectives
Counter-objectives
Simulate a procedure
Verify your procedure
Procedure book
Add permissions to a procedure
Trigger a procedure simultaneously
Divers
Triggering procedures & alerts
Manually trigger a procedure
Follow-up of a real-time procedure
Trigger a conference call
Create a procedure report
Status of sent messages
What is an external trigger
Manual triggers
Trigger an email procedure
Sending an alert to pre-selected contacts
Sending an alert to non-directory contacts
Sending an alert to AlarmTILT® contacts
Email trigger authorization
Add an attachment to your alerts
Establish connectivity monitoring surveillance (Heartbeat)
Statuses of incoming events
The CMC (Crisis Management Center).
Create a CMC
Trigger a CMC
Connect to CMC
Report CMC
AlarmTILT® Mobile.
Install the AlarmTILT® Mobile app
The AlarmTILT® Mobile interface
Access rights to the mobile application
General
AlarmTILT® Mobile PIN code management
Triggering procedures & alerts
Follow-up to a procedure or alert
Go to my inbox
Launch a CMC from AlarmTILT® Mobile
Appendixes.
User roles in AlarmTILT®
Conditional recipient variables
AlarmTILT® system variables
List of AlarmTILT®numbers
Frequently Asked Questions.
Frequently Asked Questions
Getting started with AlarmTILT®.
Everything you need to know to get started with AlarmTILT®.
Connect to AlarmTILT®
AlarmTILT® is a crisis management tool independent of all your infrastructures computers.
No installation is required. To access the software, you must be connected to the Internet, (It is recommended to use Google Chrome or Mozilla Firefox browsers).
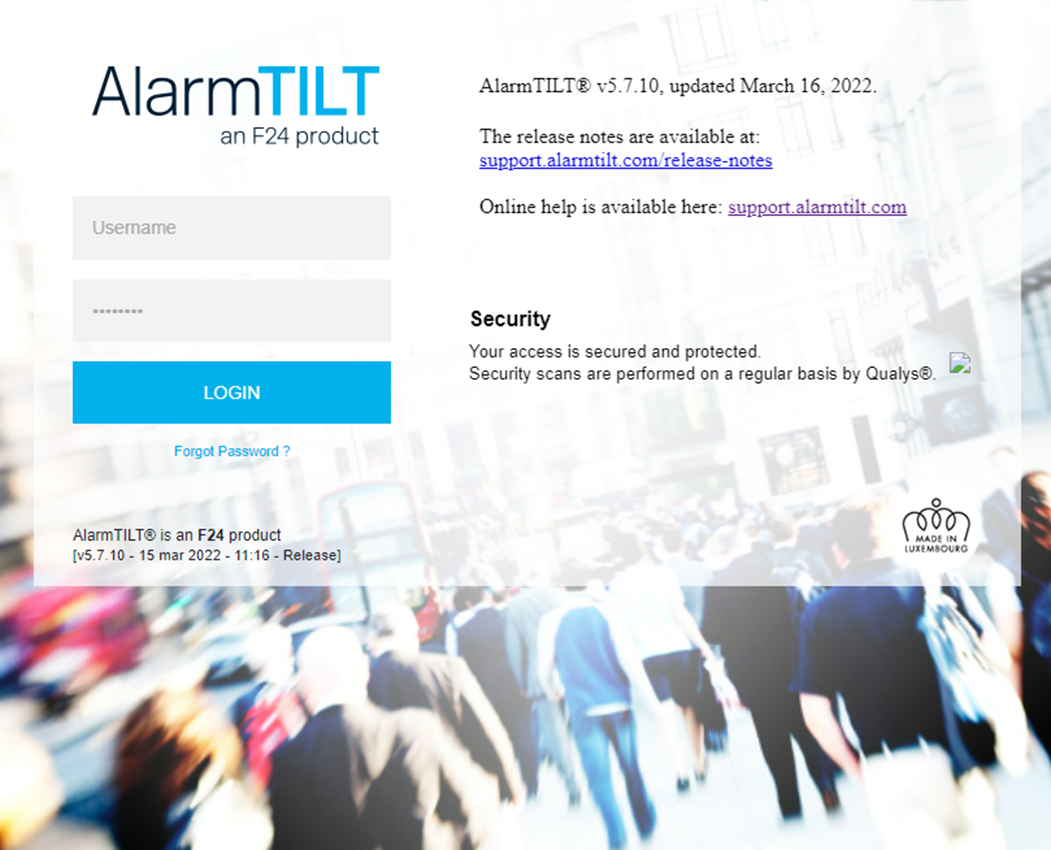
From the AlarmTILT.com website
- Directly from our website www.alarmTILT.com, click on "Customer login" (You can also go directly to the login page at the following URL address: https://V5.alarmtilt.net)
- Enter your username (e-mail from your AlarmTILT user account) and password to access the AlarmTILT web® interface.®
- Click on " LOGIN "
The AlarmTILT® interface

The AlarmTILT® user interface consists of several parts:
- Main block
This is where, depending on your user role, you get access to the different Features of AlarmTILT®.
- User block
This is where you can switch from one user role to another to access the different features of AlarmTILT®. By clicking on your username, you will also be able to access your account (to change language and password) or log out.
- Tab block
A new tab opens each time you enter an AlarmTILT® functional topic. When you exit a functional topic, the tab closes automatically. This area allows to switch between features with ease.
- Footer block
This area displays information about the version of AlarmTILT® that you are using.
Against a forgotten password
In case of forgetting your password, AlarmTILT® offers to reset it.
Method
- Click on the link "Forgot your password?” a page should open asking you encode your login and respond to a captcha
- Click "Continue"
- You will receive an email with a link through which you can reset your password .
Change the language of the AlarmTILT® interface
AlarmTILT® is available in three languages: French, English and Dutch.
Method
- Click on your user profile at the top right: *add
- Click on "My Account" in the control panel.
- Click on "Languages" in the left navigation
- Select the desired language by activating the button to the left of the language name
Contact AlarmTILT® Support
To meet the needs of each of our customers and users, AlarmTILT offers you different ways to access and contact our support system.
- Dedicated website
All information concerning the use of AlarmTILT® is accessible directly from our support website at the following internet address: https://support.alarmtilt.com.
- Chat live
A live chat is available for all questions regarding the use of AlarmTILT®. Accessible directly from the support website, live chat allows you a direct exchange with technical support.
Access the live chat: https://support.alarmtilt.com
- Call technical support
The support is available Monday to Friday, from 9am to 5pm.
To reach the support, call +352 261 846 1 / +33 372 880 275.
- Call emergency support (hotline)
Outside the standard support hours and in case of a problem preventing the usage of AlarmTILT®, you have the possibility to join an emergency hotline, available at the same number.
To reach the emergency line, dial +352 261 846 1 / +33 372 880 275.
Administration.
Manage your crisis management tool with ease.
Add a contact
Adding a new contact in AlarmTILT® is done by directly clicking on the button dedicated for the configuration of this new contact.
Method
- Click on " Directory "
- Click on " Add Contact "
Additional information
Contact details: Indicate the Contact's First and Last Name; as long as these 2 values are not filled in, you will not be able to navigate in the other pages. Then, add one or more media: SMS, Email, Voice Message, Fax,...
Authentication/Roles: Allows you to assign a role to the contact. He will have an identifier that will allow him to connect to AlarmTILT® and perform actions related to this role.
Attributes: They must first be created by the administrator. They are used to add information about this contact, for example, a function.
Messages received: A list of all messages received by the contact.
History: List of updates made to the contact.
Groups: List of groups to which the contact belongs.
Procedures: List of procedures that belong to the contact.
References: Indication on usage of the contact in the software and if it can be suppressed.
With AlarmTILT® Enterprise you can partially hide some data in the directory.
Method:
- Log in as administrator and enter the contact card
- Then check the "Confidential" box of the media you want to hide
- Only your contact will then have access to your number / personal data
In the directory view, as well as on the contact card, media of type "Confidential" will be partially hidden.
Create an authentication profile
An AlarmTILT® authentication profile is a user access to the system. Depending on the role assigned, the profile will get access to the different features of AlarmTILT®.
Method
- Click on "Directory" and then select a contact (or create a contact if necessary).
- Click on the relevant contact
- Click on " Authentication/Roles "
- Enter the login (for example, the contact's email address) and enter a temporary password
- Assign at least one role to the contact (List of default roles in appendix)
Two-step authentication
For added security, you can set two-step authentication to log in to AlarmTILT®.
This two-step authentication is done through your username and password, followed by additional authentication with the sending of a confirmation code by SMS or MAIL.
Add user access to the mobile app
To add an user access despite the role, you have to activate the SMARTPHONE media from his contact file, directly on the AlarmTILT® web interface.
Import/Export of contacts
The "Import" function, available under "Administrator", allows you to add contacts from an Excel file (. xls or .xlsx.). This feature also allows you to quickly update multiple contacts.
Relevant articles "How to import contacts?" "How to update multiple contacts ?" "How to export contacts from the Directory ?"
Import contacts
- Go to the "Administrator" tab
- Click on " Import/Export "
- Click on « New import »
- If necessary, download the .xls or .xlsx, in order to respect the format requested by AlarmTILT®
- Select your .xls or .xlsx to import
The download will then be set to the "Scan awaiting processing" status, which means that the system is preloading your data before scanning it: Once the file is preloaded, you will receive an email informing you that the import is awaiting validation.
At this point, the contacts in your Excel file are still not imported into your directory. The system will ask you to first check for possible errors in the file.
If the result suits you, you can click on "import".
Your contacts will then be imported into the directory within the next few minutes. You will receive a confirmation email again.
Update multiple contacts simultaneously
- Export the directory
- Edit the .xls obtained during export
- Import the .xls
Export the contacts of the directory
Since the page « Import/export », Click on « Export ».
Create and manage a contact group
A contact group is a group in which multiple contacts have been added manually.
Unlike dynamic selection based on attributes, a contact group only varies if it is modified. "What is a group and how to create it ?"
Method
- Click on "Add Group"
- Name your group and click on " Add Recipients "
Add recipients to a group
Add only certain contacts:
- Select the desired contacts and click "Add"
Add all the contacts in the directory :
- Click "Add All "
Remove recipients from a group
- Select the contacts you want to remove from the group in the right part and click "Delete "
- To delete all selected contacts, click " Delete All "
- Save with the button “Close”
Create and manage a dynamic selection
Dynamic selection is based on contact attributes to form a contact group " dynamic".
She can be Created either automatically (the creation of a agenda Generates one selection dynamic — To see " how to create a agenda ") either manually:
Relevant articles "What is a dynamic selection and how to create it ?
Method
- Click on the "Add Dynamic Selection" button

- Establish the conditions for dynamic selection (for example, contacts with the " Function = Administrator ")
- To add multiple conditions, click the

- Click on the "here" link to preview the contacts affected by the condition(s)
- Save
Maintain the data of your contacts up to date
Having your contacts' data up to date is essential to ensure an effective crisis communication. That's why we encourage you to set up the necessary process with AlarmTILT® to allow you to verify and validate the contact details of all recipients in your directory in just a few clicks.
Method
To send a data verification request to your contacts or to a part of your directory, you need to create a specific procedure.
- Log in as a procedure manager and create a new process that you will name "Update contact", for example.
- Click on "launch form" and add the variable "System data". Select "Contacts.S001" from the drop-down list. This will allow you to select the recipients to contact, at the time of starting the process.
- Set up the email to send to your contacts. New variables have been created for this type of process. The variable to be specified in the body of the email is the variable {ContactUpdate.single}; it is this that will allow the generation of the update link.
- Configure the response time. It must be equal to a maximum of 48 hours (lifetime of the generated link - after this timeline, access will be denied).
- Click on " Validate "
- Configure the objective of the step. It should be set to "Contact refresh — 100%"
- Save your new process.
Create a contact attribute
An attribute is an additional indication that can be added to the card of some contacts. This information can be for example the function that the contact performs, his age, his date of birth, his place of residence.
This information is useful when creating dynamic selection to alert for example only contacts performing function A and living in place X.
Relevant articles "How to create a contact attribute ?" "What is an attribute ?" "How to edit a contact attribute ?"
Method
- Click on the "Attributes" action button
- Click on " Add "
- Enter a name, such as " Date of birth "
- Choose a type, for example, "Date" (choose the desired format)
- If necessary, add a "Context-sensitive Help". An icon will appear next to the field and display your explanation
- Save.
Attach an attribute to a contact
- Click on " Directory "
- Find and select a contact
- Click on “Attribute”
- Choose the Date of Birth attribute, choose a value, and click the floppy disk record
- Multiple values can be entered for the same attribute
- Click "Backup"
What is a global alert scheme?
Through the Alert Schema page, you can create global alert schemas. These schemas replace personal alert patterns when used in a message or procedure. By using this alert scheme in your procedures, all of your recipients will be contacted in the same way.
Method
- Click on the "Alert schemes" button,
- Click on " Add ",
- Name your alert scheme, for example "Night Reminder",
- Click on " Add Media ",
- Choose the type, for example " Email "
- Select a second media, for example " SMS "
- Configure the duration (the time that will elapse before launching the alert on the next media, for example 2 minutes)
- Click "Save"
What is a personal alert scheme?
A personal alert scheme defines the order in which a contact will receive an alert. By using the personal alert scheme, each contact will be alerted differently.
Example : SMS, then email, then voice
Each contact has a personal alert scheme.
The personal alert scheme is configured on the contact's own card:

- The "Duration" option indicates the waiting time before switching to the media in which the duration is indicated.
- The "Disable" option allows you to temporarily exclude media from the schema without deleting it.
- The "Confidential" option hides data from a media outlet. Only the owner of the data will be able to see the content.
You will then be able to select this alert scheme when creating your procedures. The alert scheme is located just below the recipients when writing a message about a step in a procedure.
Create a calendar
Calendars can be added to the AlarmTILT® calendar. Creating a calendar generates a dynamic selection that, when used as a recipient within a procedure, only the people who are present in that calendar will be alert when the procedure gets triggered. "How to create a Calendar ?"
Method
- Log in as " Directory Manager "
- Click on "Calendar" and then click on the "+" to the right of "My Calendars".
- Name your calendar, and choose a color.
- Save.

Calendar management screen
Add an event
As soon as you create a calendar, you can add events with specific dates and times and contacts (guests).
The events allow the management of guard or surveillance towers, and the people to be alerted according to the guard towers. "How to add an event ?"
Method
- Click on "Add Event"
- Select the relevant calendar
- Enter the period during which the contact could be notified
- Select the contacts affected by the event
- Check "Recurrence" if it is a repetitive event and configure recurrence
- Click "Save"
Recurrences
You have at your disposal a number of possibilities to schedule a recurrence of an event :
- " Daily": every day
- "Every working day": every day from Monday to Friday
- "Weekly": once a week
- "Every two weeks": every other week
- "Monthly": once a month
- "Annual": once a year
The AlarmTILT® alert thread
The Alert Feed is a web page generated by AlarmTILT® where you can send information about the incident or share documents.
It is a media in its own right.
The ideal is to plan, in the procedures, to send the URL link by e-mail / SMS / smartphone to people who need to consult it, and in parallel, to send information or documents so that the alert thread is fed continuously.
Method of creating the alert thread
- Click the action button " Alert Thread "
- Click on " Add alert thread "
- The " Label " field is mandatory
- Create a contact
- Attach the alert wire to this contact
Feeding method of the alert thread
- As a "procedure manager", and when adding the contact linked to the alert thread
- Compose the messages to send
- In parallel with this action, copy and paste the URL link into another message so that your collaborators can view the alert thread.
Remarks
- You have the option to protect access to the alert thread with a password.
- An option allows you to view it at any time.
- When you start your procedure, your alert feed will be fed with the configured message. You can also simply send a simple message to the contact linked to the alert thread.
Protect the thread alert with one against of Pass
- Click the "Alert Thread" action button.
- Check the box " Protect access to the alert thread by password " and enter the desired password.
Make sure that the contacts to whom you send the URL link have knowledge of the password you set.
- Then click on " Save ".
Create a report
The reports gives you indications on your use of the AlarmTILT® tool, also on the number of triggers or the number of subscribers in the case of citizen alerts for example.
Relevant articles "Procedure report
Method
- Click on " Report "
- Click on " Create a report "
- A default report name is specified, it can be modified if necessary. By default, a period of one year is indicated.
- Once the correct data has been chosen, click on "Generate"
Generating a report takes more or less time to be available (usually less than a minute).
- A status indicates the status of :
- Pending report
- Identification failed: click on "Restart generation"
- Report executed/Notification sent: the report is ready to be downloaded as PDF or XLS
- As soon as the generated report is available for download, you will receive an email to let you know that it is now available.
The different types of reports
The report of the triggered procedures
The "Procedure Initiated " report shows the number of procedures that have been triggered and the distribution of triggers. This report consists of several parts:
- A title page
- Table (x) by business units showing the name and number of procedures triggered
- A graph showing the overall distribution of triggered procedures
The report of the procedures triggered by period
The launched procedure report per period, gives you a view of the triggers for each procedure for a selected period
This report consists of several parts:
- A title page
- A summary of the number of triggers of each procedure per period
- A graph representing the number of launches per period.
Create an administrative unit
The creation of the administrative unit makes it possible to have within the same AlarmTILT® license different accesses, to the procedures, contacts and dedicated access.
Method
- Log in as Administrator.
- Click on the "Organization" action button,
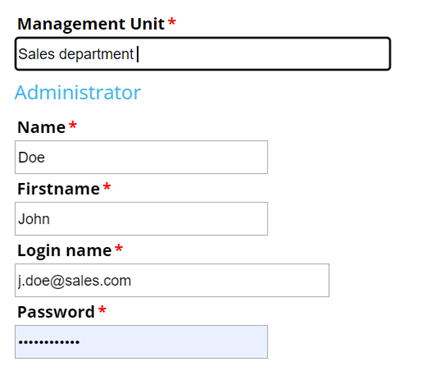
- Click on "Add administrative unit",
- Enter the name of the desired administrative unit : Here, "Sales Department"
- Enter a login name for the administrator of this administrative unit,
- Save
To log in with the administrative unit you just created, simply use the login name and password that you configured during creation.
Share the directory between administrative units
Since you created and configured several administrative units within AlarmTILT®, the directories are distinct and specific to each.
In order to avoid having to manage multiple directories, with all the constraints that this can generate, you can share the directory of one administrative unit with the others. "How to share directory between Management units ?"
Method :
- From the first administrative unit, click on "Organization"
- Click on "Administrative Unit Access "
- Select the relevant administrative unit and provide access to this unit by clicking on "Copy"
- Save
- Log in to the second administrative unit
- Click on " Organization "
- Click on "Administrative Unit Access "
- Select the first administrative unit
- Save
Creating and accessing a cross-service link
The inter-service link is used so that any user from one administrative unit can connect to an another administrative unit without necessarily having to have two separate logins/passwords. This allows to switch from one account to another with ease.
Method :
- From the second administrative unit, click on "Organization", then on "Add interservice link",
- Select from the list the first administrative unit,
- Select from the second list the contact of the first administrative unit,
- Save.

Print an overview of contacts by administrative unit
This function is used to list and present the hierarchy of your AlarmTILT® account. You can have a view of the contact lists, groups, and dynamic selections by administrative unit.
Method
- Click on " Directory"
- Click on "Organization Book"
- Click on "Create the organization book"
A PDF file will be generated. You will have a document presenting all the administrative units and contacts associated with them.
It is possible to generate the book in several ways:

- Default selection: All management units will be included, as well as the names of contacts, groups and roles to which they are attached
- Minimum selection: All field units will be included, as well as the names of the contacts associated with it
- Customize: It is possible to create the organization book according to the needs of the user.
Management of Procedures & Alerts.
Automate your crisis management.
Create a procedure
Creating processes will allow you to automate your crisis management plan accurately. When creating it, you will have to perform the basic configuration before you can manage the complete flow of your process. This one should be available in the graphic design workshop under the "Process" tab.
Relevant articles "How to trigger a procedure ?" "▶️ How to create your first Procedure"
Method
- Log in as a "Procedure Manager "
- Click on " Add a procedure "
- Enter a name for your procedure
- Specify the "Deployment Status"
(If you select "Under development", your procedure will not be visible to the procedure launcher , allowing you to work on your procedure without it being executable.)
- Click on "Process " to set up your procedure.
- Think To save regularly your work !
- Am I in possession of clear plans or organizational charts?
- Which recipients should be alerted and under what conditions?
- If a recipient does not respond, what is the follow-up?
- …
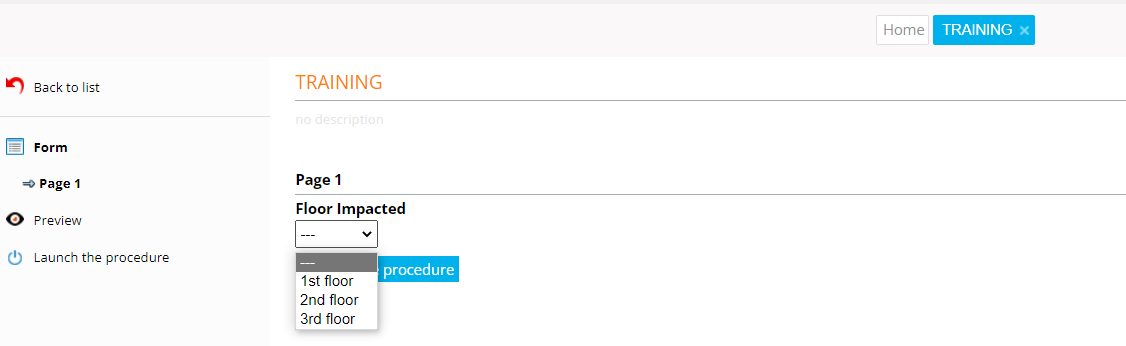
Configure/create a launching form
The launch form is easily configured thanks to the large selection of fields offered by AlarmTILT®. This is the form that the procedure launcher will have to complete before starting a process. It is therefore important that it is clear, understandable, and concise. "Selection and launch of the procedure
Method
- Click on " Launch form " ( left menu),
- Use drag-and-drop to add the fields you want to your launch form .
- When adding a field, fill in the information: Label (title of the field), name (name of the variable), mandatory (if you want the field to be mandatory to validate the form), Contextual Help (description of the field, visible in the flyover).
- The configuration of your field Completed the you Enough of pass at next.
Launch forms can be composed of several pages with conditions in function some news Provided.
Its goal will be to be able to use the variables for the creation of conditions, messages, etc.
Types of fields available for your launch forms
- Text
- Text box,
- Date,
- Date and time,
- Hour
- Number
- Drop-down list,
- Multi-selection drop-down list,
- Radio button,
- Nested list,
- List of data,
- Check box ,
- Check box group,
- Display text,
- System data.
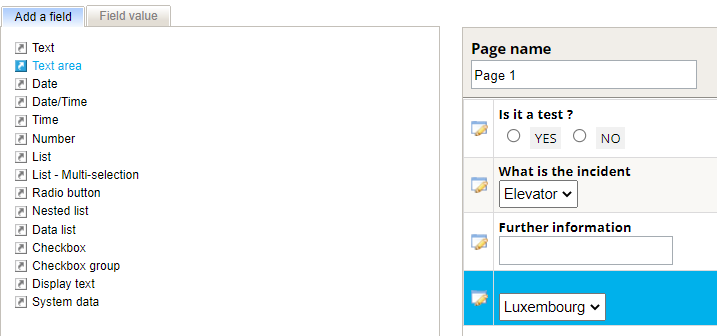
Set up a field in the launching form
In the "Add Field " area are all the variables that can be used. Drag them to the right page named "Page 1". Once the variable is added to your form, you can complete it (fields with an * are mandatory).
Method
- The "Label" field will help the procedure launcher choose the correct value of the variable.
For example, we can write down a question: "Is this a test?".
- The "Name" field is the name you give to the variable that will be visible in the messages only when managing the procedure: when sending the message, this field will be replaced by the value that the launcher of procedure will have chosen in the form
- By checking the "Required" box, the procedure launcher will not be able to trigger the procedure if he does not answer this question. So it's an existential question.
- Yes she east Completed one « Help Contextual » can appear when the pitcher of procedure will complete the form.
Remarks
- A variable must be named without accents or spaces
- Click the button to edit the form variable.
- For a list, the values must be written one below the other.
- It is possible to change the order in which the variables will appear by dragging them into the launch form.
Define conditions in your procedures
AlarmTILT® allows you to establish conditions in your procedures, which will define the next steps according to a precise criteria.
Example: Depending on the location of the incident, you want to alert one group over another.
Method
- In the launch form, add a field to define a variable.
- In " First steps ", click on the " + " to add a step, a link is displayed to define the conditions of the step.
- Click the link to open the condition window. With the help of the selection boxes, define a condition according to your needs.
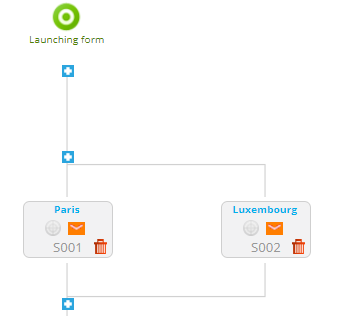
based on the example showed above, the procedure will adapt in function of the place of the incident (Luxembourg or Paris), and contact only the person who are needed.
Set conditions for recipients
With AlarmTILT® you have the possibility to add conditions directly to certain recipients. The message, the objective, and the alert pattern will not change. Only recipients will be adapted according to the values filled in the launch form.
Method
- Define a variable on the launch form: You must have created a variable directly in the launching form of your procedure (see "Create a launch form").
Example: Department impacted: If Department 1 is impacted, some people will need to be alerted; on the other hand, if it is department 2, other people will be alerted.
- Add a condition to the message: When you define the recipients of the message, check the "Advanced options"box. A link then appears to add the conditions.
- To add more recipients/conditions, click the "+" button
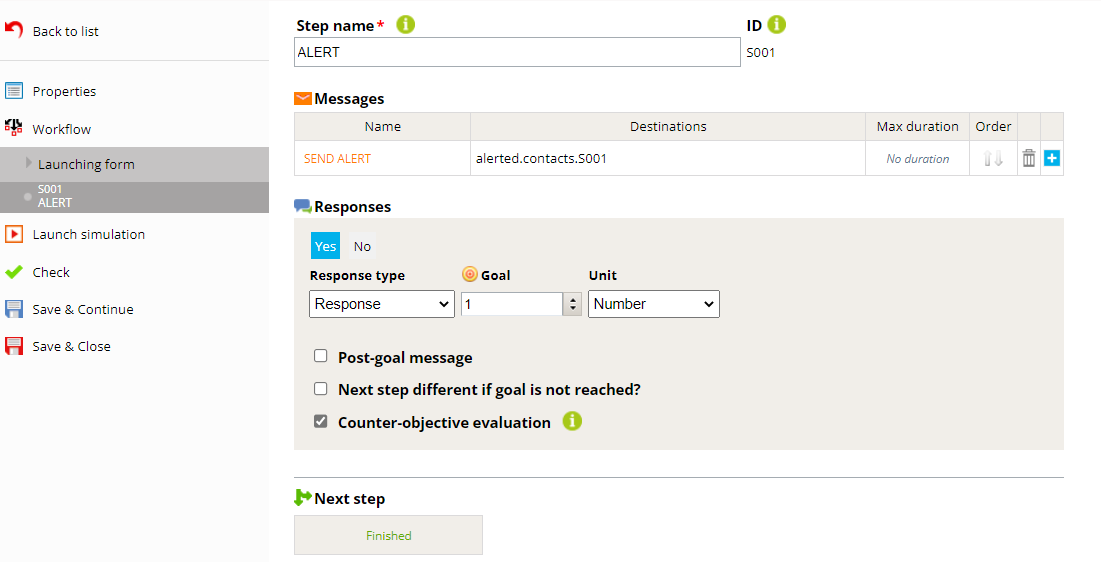
Create/configure a step
Each process consists of one or more steps that will be executed in parallel or in sequence. These are the steps that make up your process. You can plan one or more messages, one or more recipients, conditions, goals, etc.
Method
- From the process graphics workshop (section "Triggering" since editing your process), click on a + sign that appears when hovering over the graph with your pointer (click on the + which corresponds to where you want to position a new step). Your new step will appear in your procedure.
- Click on this new step
- Give your step a name
- Create the message(s) that will compose this step
- Define whether you want to receive answers, or not
If you configure that you want answers, note that you will then be able to configure the type of response, the goal (with its unit), the message after goal, the next step if the objective is not achieved, as well as the evaluation of the counter-objective.
- Choose whether you want the next step to differ depending on whether or not the goal is achieved by checking the box "Next step if the goal is not achieved? »
- Click on « Event » for return à the workshop graphic of creation of procedure
Copy the contents of a step
When creating a step, you can copy the content of a step. This option allows you to save valuable time when setting up your procedures within AlarmTILT®.
Method
- Click on the relevant step
- Check the box " Copy the contents of another step "
- Choose from the drop-down list the name of the step whose content you want to copy
- A confirmation message appears: click on "Validate"
- The entire step is copied ( messages, recipients, conditions, etc.)
Create an alert message
AlarmTILT® offers several possibilities for creating the message(s) of your step.
Relevant articles
"How to create an alert message?"
"How to copy the contents of an alert message?"
"What is a personnal alert scheme ?"
"What is a global alert scheme ?"
Method :
- Click on " New Message "
- Choose whether you want to give recipients time to respond, or of the time given to move on to the next step
- Choose a name for your message as well as the language (important for alerts vocal in particular)
- Define recipients
- If conditions on recipients are to be expected, check the box "Advanced options”
- Define the media concerned (it is possible to choose an alert scheme)
- If you want to retrieve the contents of another message, check the box "Copy texts from another message (all media) "
- Enter the body of the message (you can use user and system variables to customize your message, remember to configure it according to the media).
- Add an attachment if needed (they are Managed directly since the library AlarmTILT® and Will Delivered by email, thread alert, fax, etc.)
- Click " Validate " to save your message
Configure the maximum delay of a message
- Directly from the message configuration window, check the box "Max delay. »
- Choose the duration in figure and the desired unit of time (minutes or hours)
- Click on " Validate " then on " Save & Close "
Copy the contents of an alert message
As with the steps in your procedures, your alert messages are composed of a number of elements. For more ergonomic and to save time in setting up your crisis management plan within AlarmTILT®, you have the possibility to copy the message directly within your step.
Method
- Click the name of the message you want to edit
- Click on " Copy the definition of another message "
- Choose from the list of your steps, the content of which step you want to copy
- Copying a message includes all variants of the content by media.
Check the content of an alert message
Required User Role Procedure Launcher
When the procedure contains a launch form, it is possible to see the messages that will be sent just before the procedure is launched:
- Click on " Preview ", just before triggering a procedure
- Choose the step and media of the alert message you want to view
Manage documents/images of procedures
All files and/or images can be managed from the "Libraries" section.
Add a document or image
- Click on " Library"
- Click on "Add a document" or on " add an image"
- Click "Choose File” to select and upload your document or image in the AlarmTILT® library
- Click on "Back to list", your file is now up to date in all procedures
Edit a document or image
- Click on "Library "
- Click on the document or image of your choice
- Click on "Update" and select the new document
- Return the list of record of your modifications.
Tricks
- From the library you can preview the images directly. To preview the documents (Word, Excel, PDF, etc.), you need to download them.
- From the card of a document, you will find in which procedure it is used.
- To update an image or document, simply replace the file directly from the "Library". The file will then be updated in all the procedures and steps where it is referenced.
Lists of file formats allowed in AlarmTILT®
For documents:
- xls, xlsx, jpeg, tif, pdf, wma, pptx, webm, x3d, ogg, xlsb, rss, dtd, qct, htm, tiff, odg, mpeg, wmv, gz, odp, xml, ods, odt, ppt, bmp, eps, Takes csv, gif, css, xhtml, mp4, mp3, wav, rar, txt, go out json, zip, icon, svg, jpg, vrml, png, doc, html, docx, ps
For images:
- jpg, .jpeg, . bmp, .png, .gif
Use system variables
System variables allow you to customize the content of a message with data which may vary.
For example: launch date, recipient name , trigger email, etc.
System variables are distinct from user variables. These are the same variables for all procedures; they are available as soon as the procedure is created while user variables are created by the procedure manager from the launch form.
It is possible to use them:
- In the body of a message
- As the recipient of a message
In the body of a message
- In a message, choose to display the variables of type "System" and select the appropriate variables directly from the drop-down list provided for this purpose.
- Copy the value into the body of your message, where you want the system variable to appear.
Find the list of system variables available in the appendix.
As recipient of a message
With AlarmTILT®, you have variables that will define recipients according to the objectives established in your procedures.
Objectives
system will wait for replies to messages. You will see in real time the given answers.
Configuration
- From the configuration page of your step, in the "Answers" area, click on "Yes" to configure a goal (a response request).
- Define the type of expected responses:
- Answers: to set a goal based solely on having an answer, regardless of the content of the answer.
- Yes/no answers: to define a yes or no answer only.
- Answer yes: to define a target related to an expected number of "yes" answers.
- Answer no: to define a target related to an expected number of "no" answers.
- Confirmation of receipt: to define a target based on the reading of the alert message (by SMS, the recipient will have to acknowledge receipt by replying with " yes ", " OK ", or " yes ", "ya" etc.)
- Conference call: to be selected as part of a conference call
- Updating contacts: to be selected as part of the contact update procedure
- Set the goal in numbers and the unit defined (a number or a rate)
- Click on “To save & close” for record your configuration
Define the sequence according to the objective
When you select the option "Next step different if the goal is not achieved", a new step "If goal not achieved" appears, you just have to click on it to configure it.
In an event where the objective is achieved the next step will be started, or in the absence of a next step, it leads to the end of the procedure.
Counter-objectives
The counter-objective is an option that allows you to define the behavior of the system in case of an unattainable goal.
Example: Out of 10 contacts alerted, the goal is to have 8 "Yes" answers. If during the stage 3 people answer "No", then either:
- The step continues until the deadline expires and future responses continue to be considered.
- The stage ends because the objective is no longer achievable (10 contacts, 3 "No" answers or a capacity of 7 "Yes" answers maximum instead of 8 required).
This feature must be enabled manually:
- If enabled (default): The system does not wait for the timeout to complete,
- If disabled: The system waits for the timeout to complete.
Method
- Go to the "Progress" section of your process
- Check the "Counter-objective evaluation" box to activate the counter-objective
- Click on « To save & Close »
Simulate a procedure
In order to prepare for a crisis situation, it is advisable to regularly test the smooth running of the procedures you have in production. "How to trigger a procedure ?"
The "Start simulation" function allows to visualize what will happen in the event of a real trigger:
- Who will be contacted?
- What will be the message?
- How long does it take for the system to move to the next step?
- What happens when the recipient answers "YES" or "NO"?
In order to put you in a situation, the views are exactly the same as those that the procedure launcher will have. You have the same features as during a real trigger:
- Simulate procedure (Start procedure)
- Monitoring simulations (Procedure monitoring )
- Message History (History)
Finally, just like during a real trigger, it is possible to change the responses of the recipients manually to test all eventualities. (For example: if the next step in case of an unmet goal activates correctly)
Method
- Click on " Start Simulation "
- If necessary, complete the launch form
- You go to the page with the results of your simulation
- Click on " Close the procedure " if the test is conclusive or " Review the procedure " if you want to restart the procedure by changing either parameter.
- Restart the process of simulation with others securities To of Ok ensure of the good operation and of the good event of your procedure.
Verify your procedure
AlarmTILT® offers to check if your procedure contains any errors. The tool will analyze your procedure and use 2 levels of severity (CAUTION registration OK or ERROR registration not OK) to classify problems or errors in your procedure. "How to verify a procedure?"
Method
- Click on " Verification "
- The tool tells you if any anomalies have been detected
- Analyze the results and/or correct the ATTENTIONS.
Book of procedure
The procedure book is a "summary" of the procedure. It is downloadable in order to allow you to have a document to present to your team or to verify that everything is correctly configured.
It will include the information that the procedure manager needs: the launch form, the recipients of the steps, the messages, the alert scheme.
Method
- Click on "Procedure Book"
- Choose from the 3 types of books available to create your procedure book:
- Default selection
- Minimum selection
- Personalize
- Click on "Create The Procedure Book" to download it as a PDF.
3 types of procedure books
- Default selection:
- Properties
- Permissions
- Event
- Launch form
- Steps (messages and destinations)
- Next steps
- Minimum selection:
- Properties
- Stages (destinations
- Personalize:
By clicking on "Customize", you will be able to choose precisely what you want to appear in your "Procedure Book". Click "Select" to select all the options.
- Properties
- Permissions
- Event
- Launch form
- Steps (messages, destinations, attached files and alert scheme)
- Objective
- Next step (s)
Add permissions to a procedure
By default, procedures can be triggered by users with the role "Procedure Launcher ". You get the option to restrict rights and decide which procedure launchers can have access to which procedure. "How to add an permissions to a procedure?"
Method
- Click on the "Triggers" button.
- Under " Procedures ," navigate to the procedure on which you want to add permissions.

- Check the "Access Control Enabled" button to enable the feature.
- Click on "Add permissions" and then select from the table the persons who will have the right to start this procedure.
- Click on « To save ».
Trigger a procedure simultaneously
All procedures can be initiated several times at the same time. By default, 5 simultaneous triggers are configured, you have the possibility to modify this parameter according to your needs.
Method
- Navigate to the procedure on which you want to change the number of triggers Simultaneous
- Click on " Properties "
- Specify the desired value ("0" means there is no limitation)
- Click "Save "
Divers
Organize procedures
When creating a procedure, you can categorize the procedure. This will allow you as a procedure manager, as for the procedure launcher, to filter your search by category and to find any procedure more easily.
Method
- To add a category, log in as Procedure Manager and click the "Procedures" button
- The "Categories" button lists all the saved categories, you can add or remove them.
Deployment statuses
The deployment status is used to "protect" the procedure by preventing it from being triggered until it is in production.
2 Possible status:
- Deployed: It means that the procedure is ready to be triggered(deployed)
- Under development: this means that it is under construction. A procedure launcher will therefore not see it.
Triggering procedures & alerts
Deal with all situations.
Manually trigger a procedure
Only "deployed" procedures for which you have a trigger right on. Those procedures are visible via the "Start a procedure" button.
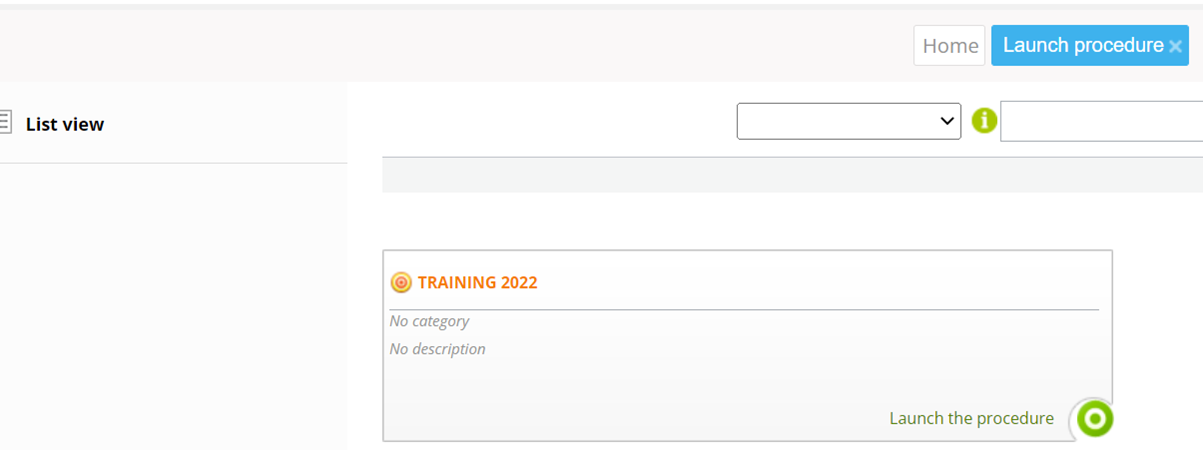
Select the procedure to start and if necessary, Fill the launching form in . The purpose of this form is to send accurate information to the recipients. Based on your answers, the message will be adapted. Recipients of messages can also vary.
Follow-up of a real-time procedure
As soon as a procedure is triggered, you can follow his progress in real time
To do this, click on "Procedure follow-up", then choose the procedure you want to follow in real time.
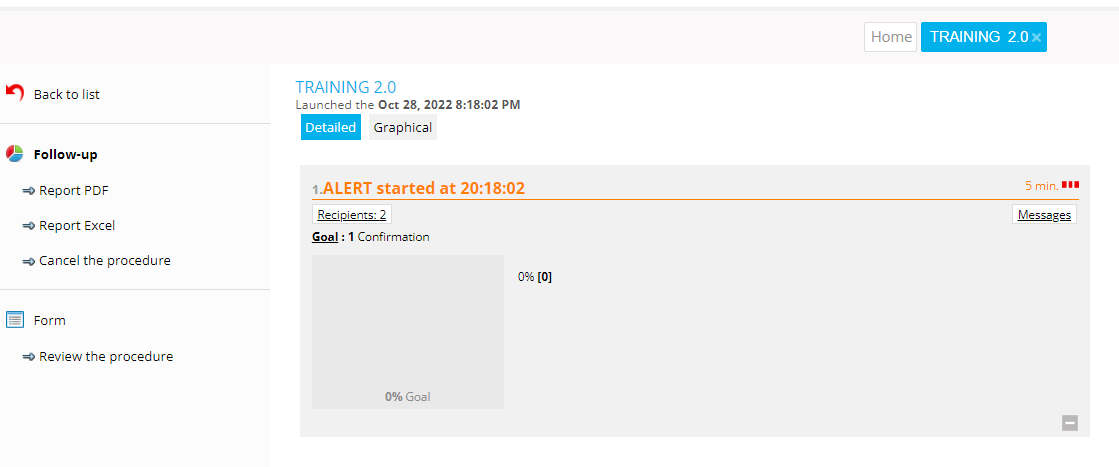
Tracking breaks down into rectangles. There is one rectangle per step. Only the rectangles that are active are displayed.
The displayed information in the rectangle may change depending on if you are asking the recipients to answer any questions.
In the example above, 100% “yes" answers are expected.
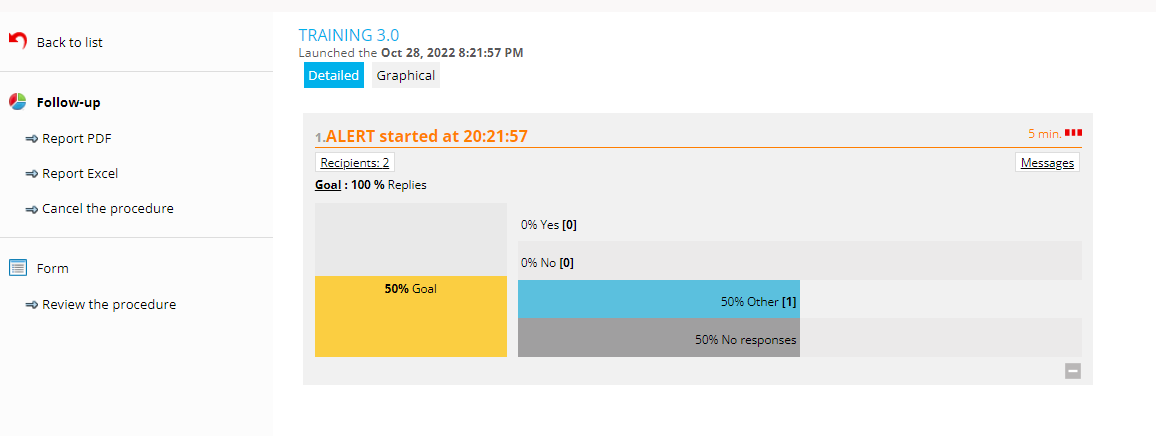
A click on the " YES ", " NO ", " OTHER " or "Recipients" rectangle displays the list of recipients and their responses.
One click on « Message » Allows to display in real time the different messages sent. Once the objective is achieved or the time has passed, the procedure will stop.
The different possible actions are:
- Create a report in PDF or Excel format.
- Close the procedure: it can no longer be revised and will no longer have any activity.
- Revise the procedure: this allows you to restart the procedure. If it contains a launch form, it will then be possible to update the data before relaunching. This changed data will appear in red for HTML messages.
Trigger a conference call
The "Conference Call" feature allows several employees to meet by phone in order to exchange, make a decision, etc.
Method
Launch a conference call from the web interface:
- As a procedure launcher, click the red "Conference Call" button
- Insert the contacts with a possible greeting. You can choose whether to record the conference call or not. Your recording will be available as soon as the conference is over.
- The conference call uses a precise global alert scheme: recipients are called:
- On their professional voice media
- After 1 minute and in case of non-response, they are called on their voice media home
- They will automatically receive an SMS and an email with a number to call back to join the telephone conference. This is useful in case of non-response, or no one picking up and or accidentally disconnects of the conference telephone.
AlarmTILT® Enterprise Exclusivity
Launching a conference call from a Cmc
From a CMC it is also possible to start a conference call. The principle is exactly the same as for the classic web interface.
Starting a conference call from a proceeding :
As a procedure manager, it is also possible to create your own conference call procedure yourself.
- Add a procedure
- In the step, choose the goal " conference " and " 100 % ".
- Add recipients or, if you want to leave the choice of recipient at the time of triggering, insert the variable "system data" and "Contacts.S001" in the launch form
For the procedure to work as if it was a trigger via the button" Conference Call " :
- As administrator, add a new "CONFCALL" alert scheme that provides for the reminder on the voice media at time 0 and then after 1 minute, a reminder on the home voice media
- As a Procedure Manager, create a new procedure
- In Step 001, choose your goal equal to "conference" and "100 percent" and a maximum delay of 2 minutes
- Insert the text variable "body" and "system data" — "Contacts.S001" into the form launch
- In the message, insert the "body" field and choose the CONFCALL alert scheme
- Specify the maximum delay of 2 minutes
- Create a post-objective message in which you will configure a custom message from type :
- TOPIC = " Invitation Conference Call — Pin "
- BODY = "To join the conference call"#{Body}", please call # {Confcall. phone} and enter the pin code #{Confcall.pin}.”
- One variable system « Contact.S001 » can be Used for the Recipients of that message
Create a procedure report
At any time you can view and retrieve from AlarmTILT® a report for each triggered procedure.
Method
- Click on " Follow-up procedures "
- Click on the procedure of your choice
- You get the detail by message (date and time of triggering, response rate, duration, content of the alert message, number of recipients, etc.)
- To export this report, go to the list of triggered procedures (return to the "Procedure follow-up" page) and directly in the procedure row click on:
- the PDF icon to download the report in PDF format
- the XLS icon to download the report in Excel format
- The icon email for send the report directly by email
Status of sent messages
AlarmTILT® allows you to have a view of all the messages sent, and their statuses.
Check the status of sent messages
- Ongoing

- Uncertain routing
Possible network error, Mobile inaccessible, Message rejected, Phone busy, Message partially rejected, Mobile inaccessible, Network error, Phone busy

- Issued
The message has been sent to our server and we have received a confirmation from our provider on the delivery.

- Not Issued
Absence of answer rejected, Destination Blocked, Telephone busy Subscriber unknown ,Error network Mobile unreachable.

- Sent
The message has been sent but we didn’t receive a confirmation of our provider, it is often the case with the smartphone notification.

- Failled
The message has not been sent, the cause can be that the procedure has been stopped before the message was send.

To get more details about a sent message, simply click on the recipient of the message. You can view the following information:
- The date of issue
- The recipient
- The media used
- The status of the message in detail
- The content of the message
- Attachments
- The answer obtained
What is an external trigger
An external trigger allows you to trigger an alert by sending an email, an SMS, or a voice call to AlarmTILT®. Sending an e-mail is free of charge (included in the system). For SMS or voice triggering, the support team must order 1 number, and an additional fee is charged. For email triggering, you just need to send an email.
Regardless of the media used (e-mail, SMS, Voice call), AlarmTILT® interprets your message and triggers the sending of an alert or a procedure that will transmit the alert to recipients.
Example 1: If you use monitoring software such as Nagios®, What's Up, among others, you can via an email, launched from this software, run a procedure, or send a message to your AlarmTILT® account.
Example 2: You can start a procedure or send a message to your AlarmTILT® account from your email software, Outlook, Thunderbird, or other.
As these 2 examples demonstrate, any system or person through the sending of an e-mail will be able to send alerts or trigger processes, without having to connect to the AlarmTILT® interface. These submissions will be archived in AlarmTILT®.
The different external triggers
There are several types of email triggering with different formatting:
- Sending messages to contacts in the AlarmTILT® directory:
Recipients must be from the directory, in the form FIRST NAME
- Simplified sending to pre-selected contacts in the AlarmTILT® directory:
"Quicklaunch". Recipients are predefined in AlarmTILT®.
- Sending a message to non-directory destinations (e.g. SMS to +352621123456):
The recipients are not from the AlarmTILT® directory, but free. Sending is possible to SMS, voice calls or e-mail.
- Procedure initiation:
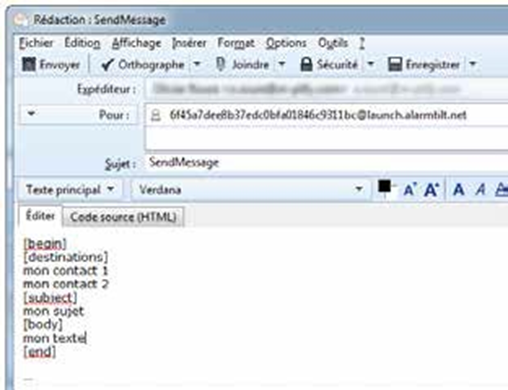
The content will respect a formatting, framed by [Begin] and [End] tags and will vary according to the variables used in the procedure
Manual triggers
Depending on your needs, a procedure can be triggered in different ways. In addition to standard triggers through the smartphone app or through the AlarmTILT® web interface.
- A procedure can be triggered in various ways: SMS, Voice call, physical button, Webservice, or e-mail.
Trigger an SMS procedure
Triggering by SMS will allow you to trigger a procedure directly by sending an SMS to a special number. In this case, no parameters (launch form) can be supported.
Trigger a voice call procedure
Voice call triggering allows you to trigger a procedure by calling a special number (and not surcharged). The voice menu allowing the trigger is set up According to your needs.
Trigger a procedure by the physical button
Triggering by physical button is possible as long as you have subscribed to the buttons with AlarmTILT®. Connected wirelessly to AlarmTILT® with a dedicated and secure network, the configuration and parameterization of the buttons are done by our services.
The physical button can take the shape you want depending on your needs. Activating it triggers a procedure.
Trigger a procedure by Webservice
In the same way as for the synchronization of contact directories, AlarmTILT® can be interfaced with your internal software.
Trigger an email procedure
Sending an e-mail to AlarmTILT® triggers the procedure or alert of your choice.
Method
- Click on " Trigger "
- Click on " Procedure " and select the relevant procedure
- Enable email triggering
- Generate the "tokens" to obtain the specific address of the trigger
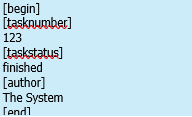
Triggering procedure with parameters (launch form variable)
Structured message body
The contacts are preset before each stage of the procedure. The list some parameters east obligatorily surrounded by [begin] at the very beginning and [end] at the end.
Example of the corps of e-mail trigger
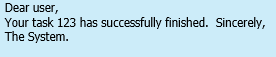
Triggering procedure without parameters
Unstructured message body
The email is not obligated to follow a [begin] and [end] structure , the body of the message will be considered as the value of a variable named BODY and the content of the subject of the email will be the content of a SUBJECT variable.
The procedure manager has to defined these 2 variables in his procedure. The variable BODY must be added to the message body and the SUBJECT variable as the name of the step.
Example of the corps of e-mail trigger :
Sending of an alert to pre-selected contacts
The advantage of this type of sending is not having to respect a special structure or the need to add the recipients of the message when creating the email, hence the name "Quicklaunch". The Administrator or Procedure Manager has already added them.
Method
- From the home page, click on "Trigger"
- Click on " Message " and select the " Procedure Launcher "
- Click on "Add s recipients" and add the desired contacts
- Click on "Generate tokens " to get the email address you use to send your email.
- Go to your favorite email software, and start writing a new email
- In the "Recipient" field of your email, enter the email address retrieved in step 4
- Come in one subject and the corps of your email that consist your alert
- Click on « Send »
Sending an alert to non-directory contacts
This type of sending allows you to send messages to recipients that are not necessarily encoded in your AlarmTILT® database. It is thus possible, for example, to contact one or more people by SMS via the sending of an e-mail.
Method
- From the AlarmTILT® home page, click on "Trigger".
- Click on " Message " and select the " Procedure Launcher "
- Click on "Generate tokens " to get the address to send the message to
- Go to your favorite email software, and start writing a new email
- In the "Recipient" field of your email, enter the email address retrieved in step 3
- E-mail must respect the structure Composed some Tags: [begin][media][destinations][subject][body] [end]
The subject of the email is not used, it is the one indicated below the [subject] tag that is taken into account
Example email
- Indicate on which media(s) you want to send your message (SMS, VOICE, E-MAIL)
- Indicate the address, the number of the recipients, according to the media(s) chosen. For SMS or VOICE, enter the number as follows: "352621123123"
- Compose your message below the [body] tag
- Send
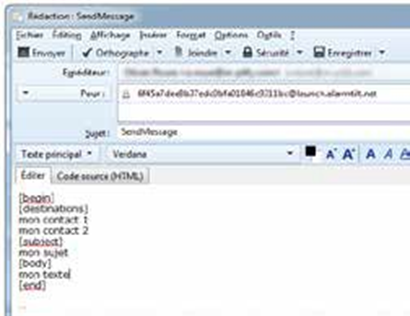
Sending an alert to AlarmTILT® contacts
This type of sending allows you to send messages to AlarmTILT® recipients. It is thus possible, for example, to contact one or more people by SMS via the sending of an e-mail.
Method
- Click on " Trigger "
- Click on "Message " and select the "Procedure Launcher "
- Click on "Generate tokens" to get the address to send the message to.
- The mail must respect the structure composed of the tags [begin] [destinations] [subject] [body] [end]
Example e-mail
- For recipients, indicate below [destinations] first the name followed by the first name
- The subject of your e-mail is not used, it is the one indicated below the tag [subject] which is taken into account.
- Compose your message below the [body] tag
- Send
Email trigger authorization
With AlarmTILT® you have the possibility to define the persons authorized to trigger a procedure in general, but you also have the possibility to prevent or stop the triggering by e-mail of a procedure.
Enable or disable email triggering
- From the home page, click on "Trigger", then on "Procedures"
- Click on the procedure of your choice,
- Using the "Trigger by e-mail" field (of type "radio button") click on "enabled" to enable email triggering OR click "off" if you do not want to allow email triggering .
Set allowed emails
From the trigger management page of your procedure, below the field « Triggering by email », you get an area allowing you to define the transmitter’s email who is allowed to trigger your procedure.
- Click on "Filtering by email address"
- In the text box, enter the emails that are allowed to trigger the procedure
- To add more email addresses, click "Add" or "+"
Manage trigger conditions
This feature is only available if your procedure has a launch form with one or more variables.
- In the "Email trigger conditions" field, click "With condition(s)" to view the trigger conditions.
- Set the conditional rule
- Set the conditions, click the " + " if you want to add more conditions.
- Simulate the evaluation of conditions
- Click "Save "
Add an attachment to your alerts
With AlarmTILT® you have the option to add attachments to your alerts (e-mail, alert thread or fax in PDF format).
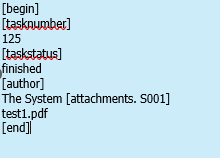
In your structured email, you will need to add the [attachments. Snnn] ("nnn" from "Snnn" is the step number of your relevant procedure, for example S001 to attach an attachment to step 1 of your procedure).
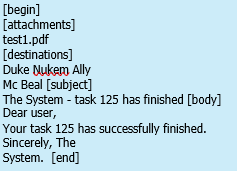
As part of sending a simple alert, without steps, it is enough to use the tag [attachments] without a step number.
Under this tag, copy the exact name of your document, followed by the file type. Example : test1.pdf - Name File Type
The [attachments] or [attachments. Snnn] is placed after the [subject] tag in the body of your email.
Example of the corps of e-mail trigger with room Attached
Example of launching a procedure with attachment
Example of starting a simple alert with attached file
Establish a connectivity monitoring surveillance (Heartbeat)
The "Heartbeat" function monitors the connection between AlarmTILT® and your monitoring system through the regular sending of emails. Multiple addresses can be created to monitor multiple systems.
AlarmTILT® expects at least 1 email per hour to consider connectivity as good. Otherwise, a notification is triggered. The waiting time can be modulated to your liking.
Similarly, when returning to a steady state, a notification is triggered to warn you of the return to normal.
Method
- From the AlarmTILT® homepage, click on "Trigger"
- Click on "Connectivity Monitoring "
- Add a hostname (e.g . " Application 1")
- Click on « Activated »
- Choose a delay between two signs of activity
- Add recipients to notify in the event of a failure
Remarks
- In the "Ping Heartbeat Email" column, you will find the email address you need for monitoring
- This email address expects at least one regular email within a time frame defined in the settings. As soon as the system no longer receives regular email, an alert is sent to the recipients that you selected when you created the connection.
Configure "Heartbeat" monitoring
- Click Trigger, and then click Connection Monitoring,
- Retrieve the email address to which your system should send the messages
- Configure the first email to be sent from your system
Statuses of incoming events
The "Status" of the incoming events tells you if the procedure was triggered or if the system encountered a problem that blocked the triggering.
Method
Click on "Incoming Events" to have the list of procedures initiated by an external trigger (e-mail, SMS, Voice call.
The status is represented by the following icons:
- Treaty: The procedure was successfully triggered

- No procedure initiation: The procedure has not been triggered — the conditions for triggering the procedure should be checked.

- No action found: Procedure has not been triggered - check the token used by your external trigger.

Inbound Event Details
Details on incoming events can be obtained from the list of procedures initiated by an available external trigger. To obtain the details you can directly go to the "Incoming Event" section of AlarmTILT®.
From the list view, you can already find a certain amount of information:
- Date of the event
- Status
- Issuer ID (example: email address of the sender in the case of a trigger by e-mail)
- Receiver ID (Email address used to create the event)
- Media used
By clicking on an event, you will get even more information. For example, you can see the content of an alert and the attachments that are attached to it.
The CMC (Crisis Management Center).
The ultimate tool for collaboration in all circumstances
Create a CMC
A CMC is a web page used as a communication platform for exchanging information to the crisis management team without being physically present in a conference room. CMC gives you the possibility to share documents (images, documents, text messages, audio recording or from a conference call).
Method
- Log in as a "Procedure Manager"
- Click on " CMC " then on " Add CMC "
- Just like establishing a procedure, the manager will configure the CMC, give it a name, a description, and link it to a procedure and/or conference call at the launch of the CMC.
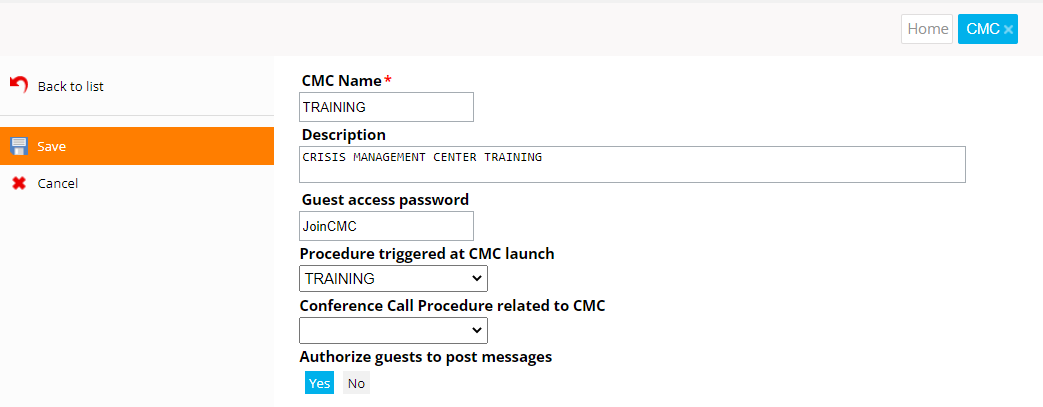
Form of creation of a New CMC
Trigger a CMC
As with procedures, you can choose between different CMCs. To trigger a CMC you must first know which one to launch depending on the situation of the crisis unit.
Method
- Log in as a " procedure launcher"
- Click the "Launch CMC" action button
- Rename the CMC if necessary
- If necessary, complete the launch form.
- Click on " Launch "

Connect to CMC
There are two ways to connect to the CMC: through an invitation received by email or directly through the AlarmTILT® web interface.
The second method implies that the person has access to the web interface as a launcher of procedure.
Method 1: Sign in via an email invitation
- When triggering your CMC, a recipient list that you have defined will receive an email invitation to log in to the AlarmTILT® CMC
- This e-mail includes the connection link to the CMC as well as the access code (password), if there is one configured
- Click on the secure link provided in the invitation email
- Log in either as a guest or as a user with your username and word Usual pass AlarmTILT®
Method 2: Connect via the URL link available from AlarmTILT®
- With the "Procedure Launcher" role, click on "CMC Tracking"
- Click on the relevant CMC and access the details about it
Report CMC
A report from your CMC is available at any time in PDF or Excel format. This report will list all actions and decisions.
Click on the action button available directly from the CMC to choose the type of report to download:
AlarmTILT® Mobile.
His crisis management everywhere with him.
Install the AlarmTILT® Mobile app
AlarmTILT® Mobile allows you to trigger procedures or send alerts wherever you are.
100% free, AlarmTILT® Mobile is available for all mobile devices (smartphones and tablets) running Android or iOS. Go to the App Store for iOS devices and the Android Market for Android devices.
To use the application, your organization must have an AlarmTILT® account.
An activation code is required. This code is the link between your user and your smartphone.
Activating your Smartphone
- Log in to the AlarmTILT® web interface
- In the contact directory, click "Add Contact" or select an existing contact.
- Add the "push" media, select the way the code is sent (sms or mail) and save to confirm.
- You have the option to send the activation code by SMS and/or e-mail to this contact by ticking the corresponding boxes and then clicking on the red envelope.
- From the moment that the addresses will have knowledge of their activation code, from then they can activate their Smartphone and use the app.
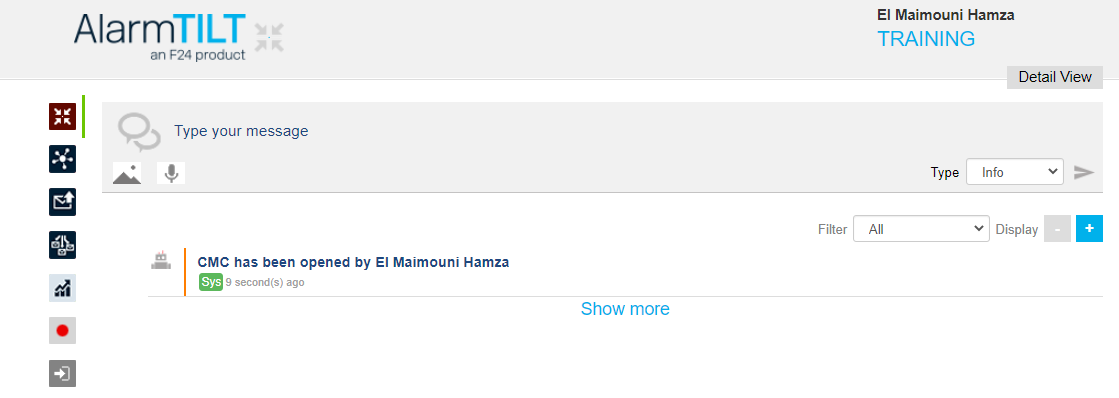
The AlarmTILT® Mobile interface
AlarmTILT® Mobile has an interface like the AlarmTILT® web interface. You will be able to find the main functions of the AlarmTILT® software.
Interface " Procedure Launcher "
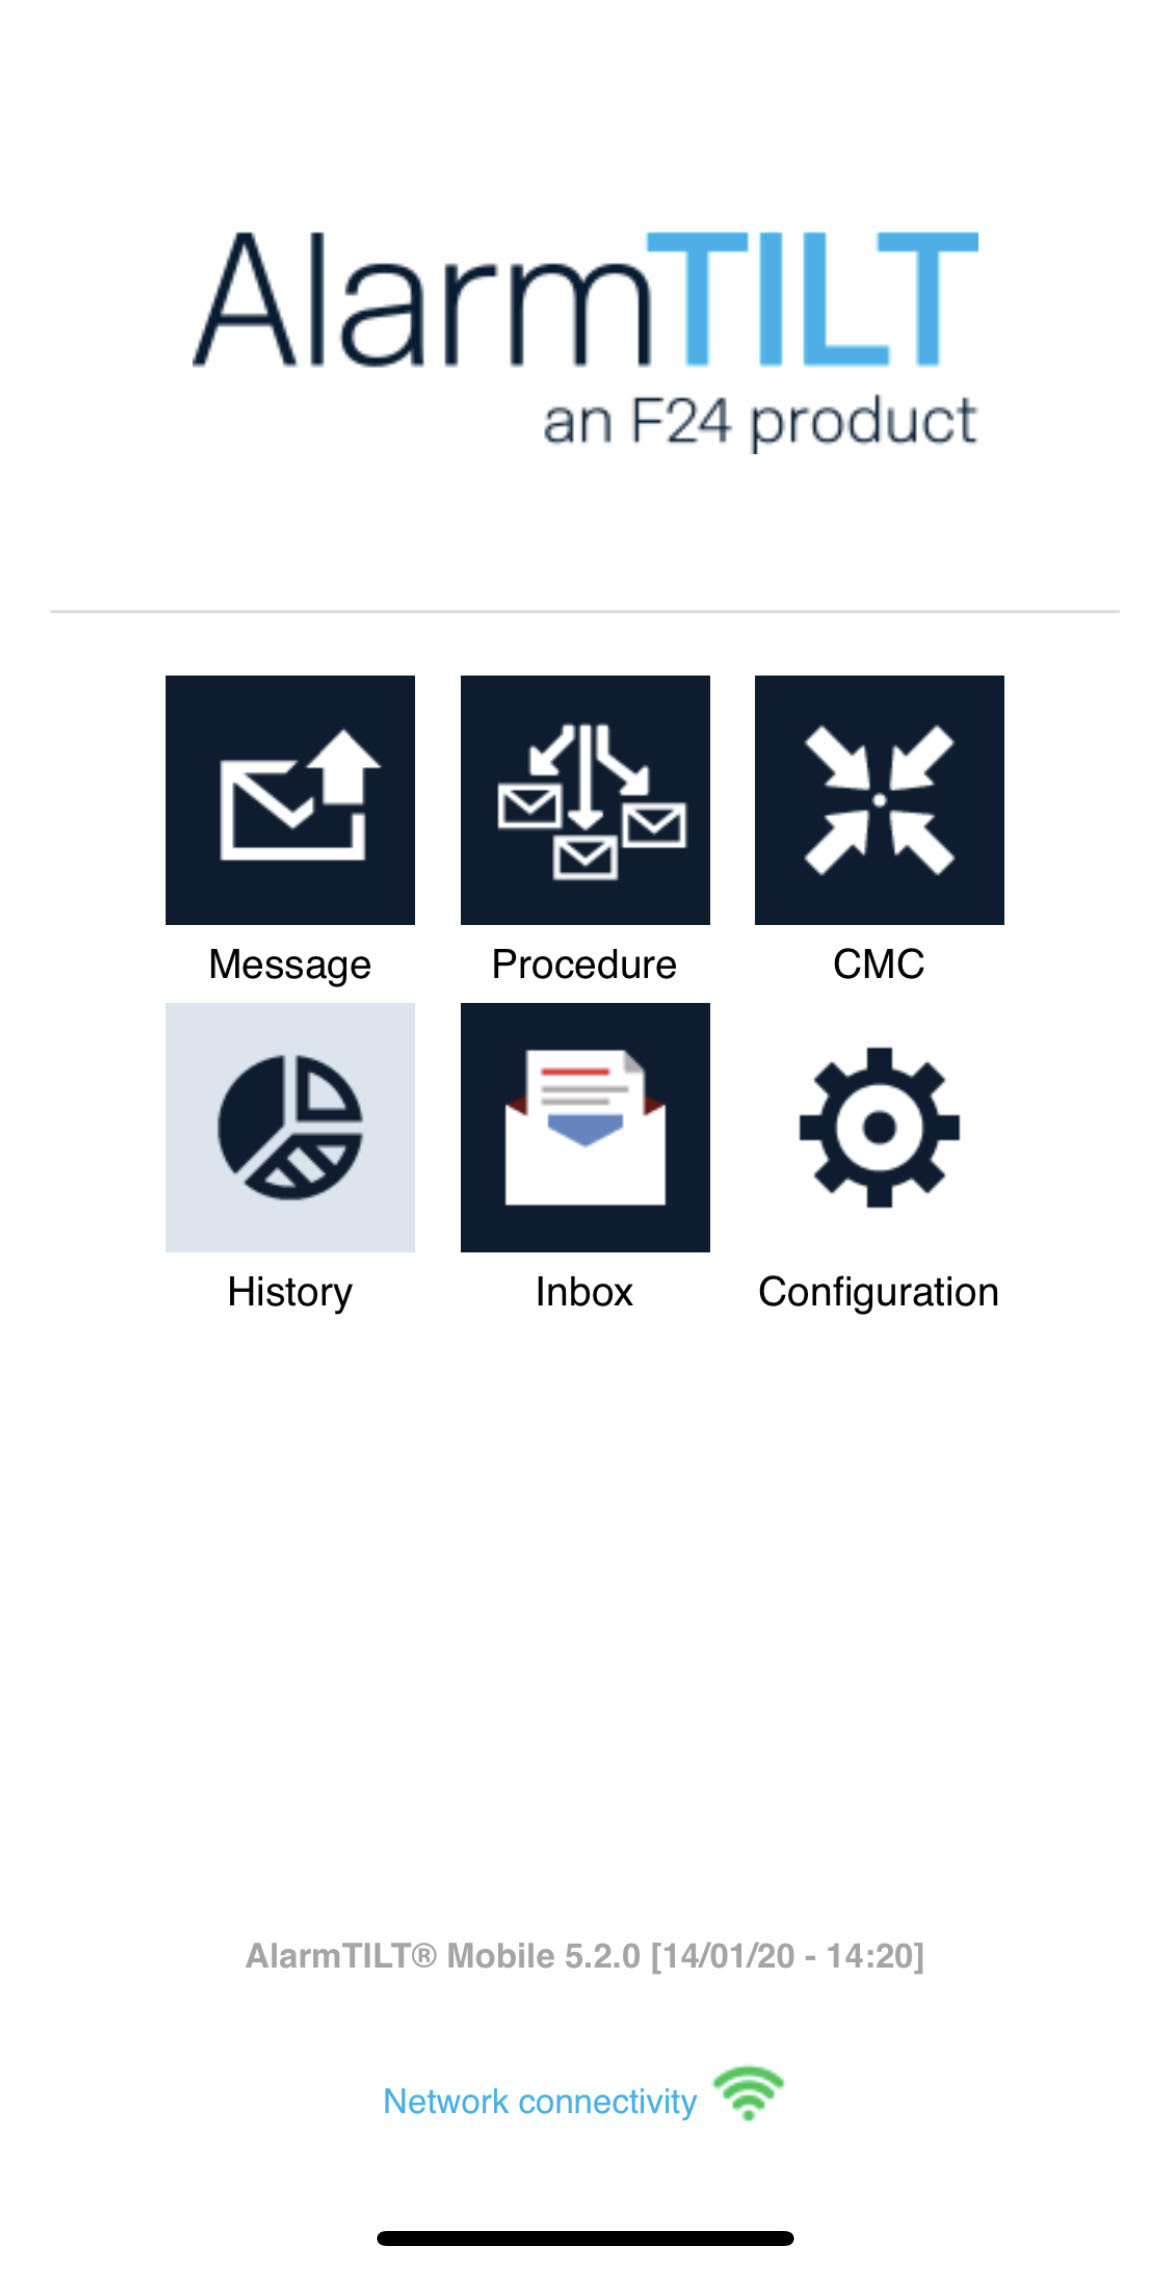
Interface " Recipient "
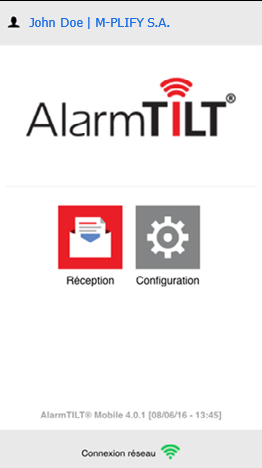
Depending on the user role you have, you won’t have access to the same features on AlarmTILT® Mobile
On the upper part, you will find the information about your account.
On the lower part, you can find the version of the AlarmTILT® Mobile application you are using as well as your network reception level.
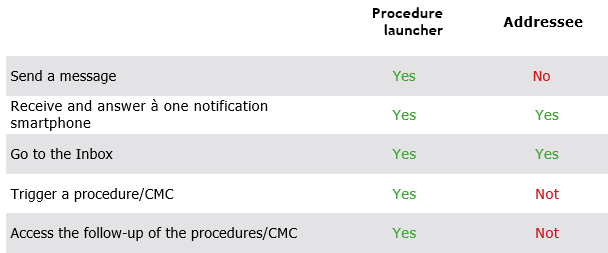
Access rights to the mobile application
Each contact in the directory can install and use the AlarmTILT Mobile app. Depending on these rights to the application, it will be either "Recipient" or "Procedure Launcher ":
Add mobile access to a user
To add user access, regardless of the role, you must activate the Smartphone Media from its contact card, directly from the AlarmTILT® web interface.
For more information, see " Install the app AlarmTILT® Mobile » (page next) and Follow the method « Activation of your smartphone ».
General
Add multiple accounts to a smartphone app
From the web interface, the same contact can have access to several subunits. From the AlarmTILT® mobile app, each contact can only have 2 smartphones. To activate a smartphone application of a subunit, a new contact with a new code must be created in the list of subunits.
Method
- On the main page, tap the upper left corner,
- Click on " Add Account "
- Enter the activation code (this code is to be created from the new administrative unit) You can now switch from one account to another via your smartphone or tablet.
Adjust the language of the mobile interface
Like the AlarmTILT® web interface, the mobile application is accessible in 3 languages according to your preferences:
- French
- English
- Dutch.
Method
- Click on « Configuration »
- Check the desired language
- As soon as the button is checked, the language of the application updates immediately.
AlarmTILT® Mobile PIN code management
The AlarmTILT® app PIN allows you to protect access to your management plan crisis and triggering of your crisis procedures.
By default, this PIN is disabled. You can enable it from the "Configuration" section of the AlarmTILT® application. How to change my password ?
Enable /disable PIN
- Click on " Configuration "
- Under "PIN ", check the "Enable/disabled" box
- Enter your 4-character PIN and confirm it
- Click on "Save PIN"
Change YOUR PIN
- Click on "Configuration "
- Enter your old PIN
- Enter your new 4-character PIN and confirm it
- Click on « To save code PIN »
Forgot your PIN ?
If you lose or forget your PIN, you have to reset your mobile app. Please Note: however, for security reasons, you will have to access your file from the AlarmTILT® web interface.
- Close the mobile app
- Uninstall and then reinstall the mobile app
- Log in to the AlarmTILT® web interface
- From the directory, delete and then recreate the Smartphone media on your contact card or ask your Administrator to do it for you
- Generate the access code
- Save your contact card
- Enter this new code in the mobile app
Triggering procedures & alerts
Triggering a procedure
AlarmTILT® Mobile allows you to trigger and track your procedures directly from your smartphone or tablet.
Method
- Access the list of procedures (all your procedures can be triggered via the mobile app)
- Select the relevant procedure
- If it contains a launch form, complete it (mandatory values are preceded by an asterisk)
- Then click on "Send"
- A message appears asking you to confirm the start of the procedure: Click "OK"
- Be careful, however, the refresh of the page is to be done manually via the "Refresh" button
Sending an alert from AlarmTILT® Mobile
With AlarmTILT® Mobile you can directly send simple alerts, on a single media or using the alert scheme (personal or global).
Method
- Click on « Message »
- Select the recipients you want to alert
- Enter topic
- Enter your message (the attachment only works for sending by email, alert thread, or fax if the file is a PDF)
- Select the desired media [or alert scheme] to send your alert.
- Click on « Send »
Follow-up to a procedure or alert
As from the AlarmTILT® web interface, from the AlarmTILT® Mobile application you can follow the progress of a procedure or the details of a previously sent alert .
Method
- From the AlarmTILT® Mobile homepage, click on "History"
- You arrive on the list of alerts and procedures launched, for more details click on the desired procedure or alert
- You arrive on the detailed sheet, you have access to the launch date, end date, the name of the steps, the objective with the results by stages, and the number of recipients per step
Go to my inbox
The inbox allows you to view the last 10 notifications received at any time. Beyond that, the notifications received are deleted automatically by the system.
Method
- Click on " Reception "
- A list of the last 10 push notifications received is displayed
- Click on the notification of your choice to get more details
Launch a CMC from AlarmTILT® Mobile
Creating or consulting a CMC from the application will open a web page. To ensure the highest level of security, you will be asked to log in with your AlarmTILT® credentials.
Method
- From the home page of the application, click on "CMC".
- A list of CMCs appears, choose whether you want to access the tracking of a CMC or trigger a new CMC
Appendixes.
User roles in AlarmTILT®
Permissions of AlarmTILT® are managed and grouped by roles. A role can be assigned to one or more contacts. The available roles differ depending on the version of AlarmTILT® used.
The different roles :
Administrator
In charge of configuring and managing the organization and access to AlarmTILT® and triggers. It accesses reports, history, and logs.
- Directory Manager
In charge of managing the directory. He imports, exports, deletes, edits, creates contacts, and manages the calendar.
- Procedure Manager
Creates, manages and tests procedures.
- Procedure launcher
Initiates procedures or messages and accesses the different histories of the procedures or messages sent.
- Listener
Manages the reports. It has access to stock histories, messages and logs.
AlarmTILT® Enterprise Exclusivity
Customizable role:
Duplicate system roles so you can customize them and create roles to suit your needs.
Conditional recipient variables
Alerted S001 : Recipients will be those who were alerted in step 1 of the procedure.
Contacts S001: The recipients will be the same as step 1 of the procedure.
Not alerted S001: Recipients will be those who were not alerted in step 1 of the procedure. Attention not alerted, because not reachable for example. This variable does not notify recipients who have not been alerted because the goal has been fulfilled before they were alerted.
Not responded S001: Recipients will be those who have not responded to step 1 of the procedure.
Response NO S001: Recipients will be those who answered " no " in step 1 of the procedure.
Response OTHER S001: Recipients will be those who responded to something else in step 1 of the procedure.
Response S001: Recipients will be those who responded (whatever) to step 1 of the procedure.
Response YES S001 : Recipients will be those who answered " yes " in Step 1 of the procedure.
Procedure Launcher
Procedure Owner : Owner of the procedure
CMC in use: Sending the message to the current CMC (this procedure will therefore have to be triggered from the CMC)
AlarmTILT® system variables
#{ContactName}: Recipient name
#{LaunchedBy.homeEmail} : Email home of the initiator of the procedure
#{LaunchedBy.homePhoneForFax}: Home fax number of the procedure launcher
#{LaunchedBy.homePhoneForSms}: Home SMS number of the procedure launcher
#{LaunchedBy.homePhoneForVoice} : Home call number of the case launcher
#{LaunchedBy.managementUnit}: Name of the management unit in which the procedure launcher is located
#{LaunchedBy.name}: Procedure launcher name
#{LaunchedBy.workEmail} : Email p
#{LaunchedBy.workPhoneForFax} : Procedure launcher's professional fax number
#{LaunchedBy.workPhoneForSms}: Procedure launcher's business SMS number
#{LaunchedBy.workPhoneForVoice}: Procedure launcher's business call number
#{LaunchingDate} : Date of initiation of the procedure
#{LaunchingTime} : Time to start the procedure
#{ModifiedBy.name }: Name of the last user who saved the procedure
#{OwnedBy.homeEmail} : Email home of the owner of the procedure
#{OwnedBy.homePhoneForFax} : Fax number of the owner of the procedure
#{OwnedBy.homePhoneForSms} :SMS number home of the owner of the procedure
#{OwnedBy.homePhoneForVoice}: Home call number of the owner of the procedure
#{OwnedBy.managementUnit}: Name of the farm unit of the procedure owner
#{OwnedBy.name}: Name of the owner of the procedure
#{OwnedBy.workEmail} : Professional email from the owner of the procedure
#{OwnedBy.workPhoneForFax}: Professional fax number of the procedure owner
#{OwnedBy.workPhoneForSms} :Work SMS number of the procedure owner
#{OwnedBy.workPhoneForVoice}: Business call number of the procedure owner
#{ProcedureDescription} : Description of the procedure initiated
#{ProcedureName} : Name of the triggered procedure
#{Revision}: Procedure revision number
#{SystemDate} : Launch date (system)
#{Contacts.S001}: Stage 1 recipient names
#{Contacts.count.S001} : Number of recipients in step 1
#{Alerted.contacts.S001}: Names of the contacts in step 1
#{Alerted.contacts.count. S001 }: Number of contacts alerted in step 1
#{Not.alerted.contacts. S001 }: Names of contacts not alerted in step 1
#{Not.alerted.contacts.count. S001} : Number of contacts not alerted in step 1
#{Responded.contacts.S001} : Name of contacts who responded in step 1
#{Responded.contacts.count. S001} : Number of contacts who responded in step 1
#{Not.responded.contacts. S001} : Names of contacts who did not respond in step 1
#{Not.responded.contacts.count. S001 }: Number of contacts that did not respond to Step 1
#{Responded.contacts.yes.S001} : Name of contacts who answered " yes " in step 1
#{Responded.contacts.yes.count.S001} : Number of contacts who answered " yes " in step 1
#{Responded.contacts.no.S001} : Name of contacts who answered " no " in step 1
#{Responded.contacts.no.count.S001} : Number of contacts who answered " no " in step 1
#{Responded.contacts.other.count. S001} : Number of contacts who responded " other " in step 1
#{Cmc.name} : Name of the triggered CMC
#{Cmc.description} : Description du CMC déclenché
#{Cmc.url}: Current CMC url link
#{Cmc.guestPassword}: Password for guest at the current CMC
#{Cmc.pinVoicemail} : Short code to join the conference call
#{Contact.name} : Recipient's name
#{Contact.managementUnit} : Management unit to which the contact belongs
#{ContactUpdate.single}: Contact media ( update request )
#{ContactUpdate.unitManager}: Account contact media ( update request )
#{Confcall.phone}: Phone number of the current conference call
#{Confcall.pin}: Conference Call Access Code
List of AlarmTILT® numbers
Alert numbers are different depending on the country code of your telephone, as well as depending on the media used :
For voice calls:
LUXEMBOURG : +35227860966*
FRANCE : +33974593383
BELGIUM : +3225885534
OTHER DESTINATION : +442382146488
Back-up number :
Number used in case of problems with our primary supplier: +35220880362
For SMS:
LUXEMBOURG: 64018 or +352691950265 or 64121 (back-up)
FRANCE : 38689, 38957, 38066, 38969 or 36200, 38656 ( back-up)
BELGIUM : 8652 or +32460213955 or +447624802843 ( back-up)
OTHER DESTINATION : +447624802843 or +447507319744
As we have multiple routes to guarantee a high rate of issuance, it may be that in either case, "no number" or "unknown number" is Displayed.
Frequently Asked Questions.
What is my version of AlarmTILT®?
The version of AlarmTILT® you are using appears at the bottom of the screen when you open a page for 20 seconds.
Where is AlarmTILT® hosted?
Premium Professional Enterprise
Our servers are physically hosted in the Grand Duchy of Luxembourg, in Windhof at the BRC as well as in Germany and France.
Can the media selection be predefined when sending a simple message?
No. The two most used media are selected by default namely Email and SMS.
Why is there the "a@" in SMS messages?
"a@" is a code. It is used to assign a response to a specific message: Within the same procedure, a person may receive several SMS more or less at the same time. Having the short code "a@", "b@", etc. at the beginning of the message allows contacts to reply "a@ ok" to reply "OK" to the first message only.
Can I respond to a voice alert recorded on my voicemail?
A voice alert is synchronous processing, that is, the response is expected immediately (an SMS is asynchronous). If the call falls on the voicemail, it will no longer be possible to answer it.
On the other hand, the recipient can at any time reply on any another media which he had possibly been alerted on (SMS, E-mail, iPhone / Android push notifications ...)
Is the calling number always the same?
Alert numbers are different depending on your phone's country code, as well as the media used. Find the list of numbers used on the "AlarmTILT® number" page.
What are "voice" calls made for? Are there any additional costs depending on the reception location ?
For redundancy reasons (if one server fails another takes automatically covery), AlarmTILT® transmits calls from different countries.
Regardless of the origin of the call, there will be no additional cost to receive it.
Can I start a procedure several times at the same time?
All procedures have a default limit of 5 active triggers simultaneously. You can change this setting, to do so go to the "Manage the number of simultaneous triggers" page .
For more information
AlarmTILT®
5 Place de la gare
L—1616 Luxembourg
[fr] +33 3 72 88 02 75
[read] + 352 261 846 1